 English
 Español
 عربى
عربى
Content
- 1 Can You Replace a Single Cylinder on a Motorcycle?
- 2 What Is a Motorcycle Cylinder and What Does It Do?
- 3 Signs Your Motorcycle Cylinder Needs Replacement
- 4 Repair or Replace: How to Decide
- 5 How to Replace a Motorcycle Cylinder: Step-by-Step Overview
- 5.1 What You Will Need
- 5.2 Step 1: Drain Fluids and Prepare the Engine
- 5.3 Step 2: Remove the Exhaust System and Cylinder Head
- 5.4 Step 3: Remove the Cylinder Barrel
- 5.5 Step 4: Remove the Piston
- 5.6 Step 5: Clean and Inspect All Mating Surfaces
- 5.7 Step 6: Install the New Cylinder
- 5.8 Step 7: Refit the Cylinder Head and Torque All Fasteners
- 5.9 Step 8: Break In the New Cylinder
- 6 Replacing a Single Cylinder on a Multi-Cylinder Motorcycle
- 7 Single-Cylinder Motorcycles: Why Cylinder Work Is More Accessible
- 8 Common Mistakes to Avoid During Motorcycle Cylinder Replacement
- 9 Cylinder Replacement vs. Engine Swap: When Does It Make More Sense to Replace the Whole Engine?
- 10 How Much Does It Cost to Replace a Motorcycle Cylinder?
- 11 Choosing Between OEM and Aftermarket Motorcycle Cylinder Parts
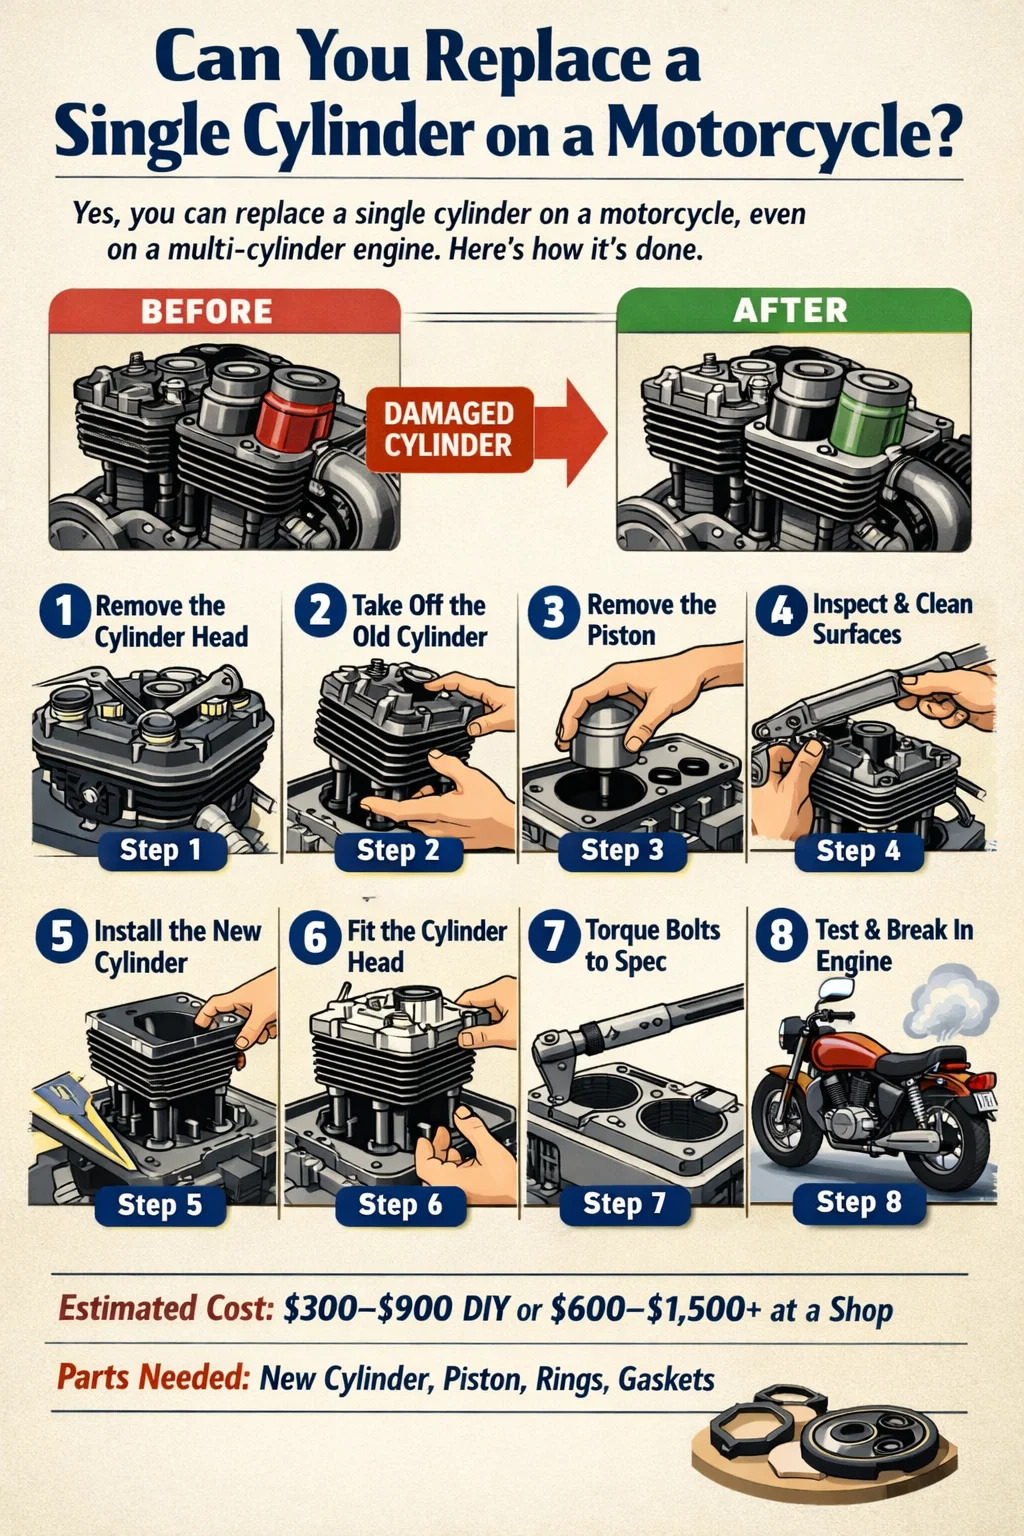
Can You Replace a Single Cylinder on a Motorcycle?
The short answer is yes — you can replace a single motorcycle cylinder, and for single-cylinder bikes in particular, this is one of the more straightforward engine jobs an experienced home mechanic or shop can take on. Whether you're dealing with a scored bore, a cracked barrel, or severe wear that honing can no longer fix, swapping out the cylinder is a well-established repair path. On multi-cylinder motorcycles, the same principle applies: individual cylinders can be replaced without pulling or rebuilding the entire engine, though the complexity increases with the number of cylinders involved.
That said, "can you" and "should you" are two different questions. The decision to replace versus repair a motorcycle cylinder depends on the type of damage, the cylinder material, whether oversized pistons are still available, and your budget. This guide walks through everything you need to know before pulling the barrel off your bike.
What Is a Motorcycle Cylinder and What Does It Do?
The motorcycle cylinder — sometimes called the cylinder barrel — is the core housing of the engine's combustion chamber. It provides the sealed bore in which the piston travels up and down, converting fuel ignition into mechanical motion. In a four-stroke engine, this happens once every two crankshaft revolutions. In a two-stroke engine, combustion occurs every single revolution, placing significantly more thermal and mechanical stress on the cylinder walls.
Cylinders are typically cast from iron or aluminum. Cast iron cylinders are easier to rebore when worn because material can be removed and the bore enlarged to accept oversized pistons. Aluminum cylinders are lighter and dissipate heat more efficiently, but they require a hardened inner lining — either a cast iron sleeve or a Nikasil (nickel-silicon carbide) coating — to survive the friction of a moving piston. This distinction matters a great deal when deciding whether to repair or replace your cylinder barrel.
A single-cylinder motorcycle engine contains exactly one of these barrels, with one piston, one set of rings, and one combustion chamber. This simplicity is one reason single-cylinder bikes are well-regarded for ease of maintenance: there is only one cylinder to deal with when something goes wrong.
Signs Your Motorcycle Cylinder Needs Replacement
Before committing to a full cylinder replacement, you need to correctly diagnose the problem. Several symptoms point directly to cylinder wear or damage, and the right diagnostic tests can tell you whether a hone will fix it or whether a new barrel is the only practical option.
Loss of Compression
A compression test is the first tool to reach for. Remove the spark plug and thread in a compression gauge. With the throttle wide open, crank the engine until the gauge reading stabilizes. Most healthy four-stroke single-cylinder engines should read between 120 and 180 psi, depending on the manufacturer's specification — check your service manual for the exact range. A reading significantly below spec points to internal leakage.
Follow up with a wet compression test: squirt a small amount of engine oil into the cylinder through the spark plug hole and repeat the test. If compression rises by more than 20%, worn piston rings are the likely culprit. If the readings stay the same with and without oil, the problem lies in the valves or head gasket — not the cylinder bore itself.
Scored or Damaged Cylinder Walls
Vertical scoring on the cylinder walls — visible as bright, parallel scratches running up and down the bore — is the most definitive indicator of cylinder damage. Scoring typically results from lubrication failure, debris ingestion, or piston ring collapse. Light scoring can sometimes be addressed with a hone to restore the crosshatch pattern the rings need to seal properly. Deep scoring, or scoring that extends through a Nikasil coating down to the aluminum base material, almost always requires either replating or outright cylinder replacement.
Excessive Bore Wear
Over tens of thousands of miles, even a well-maintained cylinder bore wears beyond its tolerance. Use a bore gauge or snap gauge with a micrometer to measure the bore diameter at the top, middle, and bottom of the piston travel zone. Compare your measurements to the standard bore specification in the service manual. If wear exceeds the manufacturer's service limit — typically around 0.05 to 0.10 mm beyond the standard bore on most Japanese singles — the cylinder needs attention.
Visible Piston Damage
Damage to the piston and damage to the cylinder often go together. Pitting or erosion on the piston crown from detonation, melted areas from running lean, or vertical marks on the skirt from dirt contamination all suggest the bore has also taken damage. When inspecting a cylinder, always remove and inspect the piston at the same time.
Persistent Oil Consumption or Blue Smoke
If your motorcycle consistently burns oil and emits blue smoke from the exhaust, and new piston rings fail to resolve it, the bore itself may have worn beyond the point where rings can seal effectively. A barrel that is no longer round — a condition called "out of round" — will not hold a proper ring seal regardless of how new the rings are.
Repair or Replace: How to Decide
Not every damaged motorcycle cylinder needs to be replaced. In many cases, the barrel can be restored through machining or replating at a fraction of the cost of a new part. The key variables are cylinder material, coating type, and the severity of damage.
| Cylinder Type | Damage Level | Recommended Action | Estimated Cost (USD) |
|---|---|---|---|
| Cast iron | Minor wear, slight scoring | Hone only | $50–$75 |
| Cast iron | Beyond standard bore limit | Rebore + oversize piston | $100–$250 |
| Nikasil aluminum | Surface scoring, coating intact | Replate (Nikasil coating) | $150–$400 |
| Nikasil aluminum | Deep scoring through to base aluminum | Replace cylinder | $200–$800+ |
| Any type | Cracked, broken, or warped flange | Replace cylinder | Varies by model |
For cast iron cylinders, reboring to accept an oversize piston — typically available in increments of 0.25 mm, 0.50 mm, and 1.00 mm over stock — is a proven and cost-effective repair. The bore is machined precisely round, then honed to produce the surface finish the rings need. Saving 50% or more versus buying a new cylinder is realistic when reboring is an option.
For Nikasil-coated aluminum cylinders, the situation is different. Once Nikasil is compromised, you cannot simply rebore the bare aluminum — the soft base material will not survive without a hardened lining. Replating services can strip and reapply Nikasil for roughly $150 to $400 per cylinder, but only when the damage has not penetrated so deeply that the base aluminum is structurally compromised. If it has, replacement is the only path.
How to Replace a Motorcycle Cylinder: Step-by-Step Overview
Replacing a motorcycle cylinder — whether on a single-cylinder engine or one cylinder of a multi-cylinder bike — follows the same general sequence. On a single-cylinder motorcycle the job is more accessible because there are no adjacent cylinders to work around, making it a realistic project for a competent home mechanic with the right tools.
What You Will Need
- Service manual specific to your motorcycle model
- Torque wrench and a full socket set
- Piston ring compressor
- Bore gauge or snap gauge with micrometer
- Gasket scraper and cleaning solvent
- Replacement cylinder, base gasket, and head gasket
- New piston and rings matched to the replacement cylinder bore size
- Engine oil and coolant (if liquid-cooled)
Step 1: Drain Fluids and Prepare the Engine
With the engine completely cold, drain the engine oil. On liquid-cooled motorcycles, drain the coolant as well. If possible, leave overnight so residual fluid fully drains from all passages. Secure the motorcycle on a center stand or paddock stand so it cannot move during work.
Step 2: Remove the Exhaust System and Cylinder Head
Loosen all header pipe bolts gradually and evenly — never remove one bolt fully before the others are loosened, as this puts uneven stress on the head. Remove the exhaust header. Disconnect any electrical connections at the head (such as the coolant temperature sensor), then remove the cylinder head bolts in the reverse sequence shown in your service manual. Head bolts on most singles are removed in a cross or spiral pattern. Lift the head clear, taking care not to drop it on the exposed cylinder bore.
Step 3: Remove the Cylinder Barrel
With the head off, the cylinder barrel is held in place by base nuts or studs threading into the crankcase. Remove these fasteners carefully and note their positions — on some engines studs are different lengths. Lift the barrel straight up off the piston. As the bottom of the barrel clears the piston rings, support the piston so the connecting rod does not bang against the crankcase mouth. Wrap the crankcase opening with clean rag to prevent debris from falling in.
Step 4: Remove the Piston
Carefully remove the piston rings by spreading each one just enough to slide it off the crown — excessive spreading cracks them. Remove the circlips (wrist pin circlips) from the piston pin bore. These are under spring tension and can fly across the workshop if not controlled. Use a piston pin removal tool or a suitable drift to push the gudgeon pin out and separate the piston from the connecting rod. Inspect the small end bearing (the needle bearing at the top of the connecting rod) and replace it if there is any roughness or play.
Step 5: Clean and Inspect All Mating Surfaces
Scrape the crankcase base surface and the underside of the cylinder head thoroughly clean of all old gasket material. Any residue will prevent the new gaskets from sealing properly. Check the crankcase mating surface for warping using a straightedge. On the cylinder head, clean the combustion chamber and inspect for cracks or erosion around the valve seats and spark plug threads.
Step 6: Install the New Cylinder
Install the new piston on the connecting rod, fit new circlips (never reuse old circlips — they are single-use safety components), and install the new piston rings as specified in the service manual, with the ring gaps staggered at the positions shown. Fit the new base gasket dry or with a thin smear of gasket sealer as directed by the manufacturer. Compress the rings with a ring compressor tool, then lower the replacement cylinder barrel straight down over the piston. Keep the bore perfectly aligned with the piston as you lower it; forcing it at an angle will break a ring.
Step 7: Refit the Cylinder Head and Torque All Fasteners
Fit a new head gasket — never reuse a head gasket. Lower the head carefully, thread in all head bolts by hand, then torque them down in multiple stages following the sequence in the service manual. Most single-cylinder engines torque their head bolts between 25 and 45 Nm depending on bolt size and engine design; your manual will specify the exact figure. After torquing, reconnect the exhaust, cooling system components, and electrical connections. Refill oil and coolant.
Step 8: Break In the New Cylinder
A new motorcycle cylinder requires a proper break-in period to allow the piston rings to seat against the bore wall. For the first 500 to 1,000 km, avoid sustained high rpm or full-throttle operation. Vary engine speeds frequently and change the oil after the first 100 to 200 km to flush any metallic particles produced during ring seating. Check for leaks after the first few rides and re-torque the head bolts after the first heat cycle if your service manual recommends it.
Replacing a Single Cylinder on a Multi-Cylinder Motorcycle
On parallel twin, inline-four, or V-twin motorcycles, you are technically replacing one cylinder barrel among several — but the process is more involved because of packaging constraints. On many V-twin motorcycles (common in cruiser-style bikes), the front and rear cylinders are individually accessible and can be removed one at a time, which simplifies the job considerably compared to an inline engine where the cylinders share a single casting.
On inline-four engines, the four cylinders are typically formed as a single block rather than separate barrels. In this design, you cannot replace just one cylinder in isolation — the entire block must be removed and replaced or reconditioned. This is a fundamentally different job from replacing the individual barrel on a single-cylinder or V-twin motorcycle and will require considerably more labor and cost.
When replacing one cylinder in a V-twin or similar design where separate barrels exist, it is worth measuring the bore of the intact cylinder at the same time. If both cylinders are similarly worn, replacing just one may leave the second on the verge of failure within a short time, resulting in a second round of labor costs. Many experienced mechanics recommend doing both at the same time if the mileage or wear level of the untouched cylinder is close to the service limit.
Single-Cylinder Motorcycles: Why Cylinder Work Is More Accessible
Single-cylinder motorcycles hold a long-standing reputation for mechanical simplicity and low maintenance costs, and this extends directly to cylinder work. With only one bore to deal with, access is straightforward, parts are easier to source, and the overall job takes less time in the workshop.
Valve service on a single-cylinder engine involves just one cylinder head, whereas a V-twin requires accessing two heads — front and rear — and a parallel-four requires working through four valves at minimum, often eight or sixteen total. For a rider who intends to do their own maintenance, a motorcycle cylinder replacement on a single is the most manageable version of the job.
Replacement parts for common single-cylinder motorcycles — 250cc to 450cc off-road bikes, commuter singles in the 125cc to 300cc range, and classic British and Japanese singles — are widely available through aftermarket suppliers. Piston and ring kits from brands that specialize in powersports engine components typically cover a wide range of bore sizes and offer both standard and oversize options, making it straightforward to match a new piston to a rebored or replacement cylinder.
Common Mistakes to Avoid During Motorcycle Cylinder Replacement
Even experienced mechanics can make errors during cylinder work that lead to premature failure or engine damage. These are the most consequential mistakes to guard against:
- Not measuring the new cylinder before installation. Even a new or remanufactured cylinder should be measured to verify it meets the specification before going on the engine. OEM and aftermarket parts are not always within tolerance straight out of the box.
- Reusing circlips. Piston pin circlips are single-use parts. A used circlip that comes loose inside the engine will destroy the bore and piston within seconds. Always fit new ones.
- Incorrect ring gap. Check the end gap of each piston ring in the bore before fitting. If the gap is too small, the ring ends will butt together when the cylinder heats up and expands, causing the ring to break or score the bore. If too large, compression will be poor.
- Wrong torque sequence or values. Head bolt torque sequence exists to distribute clamping load evenly across the head gasket. Skipping the sequence or over-torquing can warp the head or crush the gasket unevenly, leading to a blown head gasket shortly after reassembly.
- Debris in the crankcase. Leaving the crankcase open without covering it during the job invites grit, gasket material, or hardware to fall in. Any debris that reaches the oil passages or crankshaft can cause catastrophic damage at the bottom end.
- Skipping the break-in period. Installing a new cylinder and immediately riding at full throttle will prevent the rings from seating correctly and can score the fresh bore within the first few hours of operation.
Cylinder Replacement vs. Engine Swap: When Does It Make More Sense to Replace the Whole Engine?
Sometimes, the economics of cylinder replacement tip in favor of simply sourcing a used replacement engine. If the bottom end of the engine (crankshaft, connecting rod bearings, transmission) also shows wear, spending several hundred dollars on cylinder work only to have the bottom end fail shortly after does not make financial sense.
As a general benchmark: if the cost of the cylinder replacement — parts plus labor — approaches or exceeds 60 to 70% of the cost of a known-good used engine, and the rest of the engine has not been recently inspected or serviced, a used engine replacement is worth considering. The appeal of a full engine swap is that you know everything inside it has been running together and is in consistent condition, whereas a targeted cylinder repair can expose other problems once the engine is opened up.
That said, a used engine carries its own unknowns. Without a compression test, leak-down test, and oil analysis on the donor engine before purchase, you are trading one set of uncertainties for another. Many riders prefer the transparency of repairing a known engine with diagnosed problems over installing a used unit with an unknown history.
How Much Does It Cost to Replace a Motorcycle Cylinder?
Cost varies widely based on cylinder type, motorcycle make and model, whether OEM or aftermarket parts are used, and whether the work is done DIY or by a shop. The table below gives realistic cost ranges for the most common scenarios:
| Repair Type | DIY Parts Cost | Shop Total (Parts + Labor) |
|---|---|---|
| Hone only (light wear) | $50–$75 (machine shop fee) | $150–$300 |
| Rebore + oversize piston kit | $100–$250 | $300–$600 |
| Nikasil replate | $150–$400 (specialist fee) | $350–$700 |
| New OEM cylinder + piston + gaskets | $300–$900+ | $600–$1,500+ |
| Aftermarket cylinder kit (piston + barrel) | $150–$500 | $400–$900 |
For a typical small to mid-size single-cylinder motorcycle, the total cost of a DIY cylinder replacement — including the new barrel, piston kit, gasket set, and new circlips — usually falls between $200 and $600 in parts, depending on whether you choose OEM or quality aftermarket components. Shop labor for the complete job on a single-cylinder engine typically runs three to six hours, at shop rates that commonly range from $80 to $130 per hour, putting the labor-only cost at roughly $240 to $780.
Choosing Between OEM and Aftermarket Motorcycle Cylinder Parts
OEM cylinders are manufactured to the same specifications as the original part and will fit and perform exactly as designed. For current production motorcycles still under warranty, or for high-performance bikes where tolerances are tight, OEM is the safer choice. The main drawback is price — OEM cylinders can be significantly more expensive than aftermarket alternatives, and for older or discontinued models, OEM parts may no longer be available at all.
Aftermarket cylinders and piston kits from reputable powersports parts suppliers are a well-established alternative and cover a wide range of motorcycles. For many common single-cylinder off-road and commuter bikes, aftermarket piston kits include the piston, rings, wrist pin, circlips, and sometimes the cylinder — at a significantly lower price than OEM. Quality varies among aftermarket brands, so it is worth verifying that the supplier has a track record with your specific engine before committing to a purchase.
One practical note: when ordering an aftermarket cylinder, verify the bore diameter, stud hole pattern, and port layout against your original — particularly on older or less common motorcycles where multiple production variants may have existed. Using the OEM part number as a reference when ordering aftermarket ensures you receive a direct replacement rather than a close-but-not-quite-compatible part.
 Aluminum Alloy Motorcycle Cylinder for Yamaha Engine Parts")

 wear-resistant Yamaha aluminum alloy motorcycle cylinder")
 durable Yamaha engine cylinder")
 Yamaha aluminum high-performance motorcycle engine cylinder")
 Yamaha aluminum alloy motorcycle components")
 Yamaha motorcycle cylinder engine parts")
 Yamaha water-cooled aluminum engine cylinder")
