 English
 Español
 عربى
عربى
Content
- 1 Is It Hard to Change a Motorcycle Cylinder? The Short Answer First
- 2 Why Would You Need to Change a Motorcycle Cylinder in the First Place?
- 3 How a Motorcycle Cylinder Actually Works: What You're Dealing With
- 4 Tools Required to Change a Motorcycle Cylinder
- 5 Step-by-Step Overview of Changing a Motorcycle Cylinder
- 5.1 Step 1 — Preparation and Safety
- 5.2 Step 2 — Remove External Components
- 5.3 Step 3 — Remove the Cylinder Head
- 5.4 Step 4 — Remove the Cylinder
- 5.5 Step 5 — Inspect and Remove the Piston
- 5.6 Step 6 — Inspect and Measure the New Cylinder
- 5.7 Step 7 — Install the New Cylinder
- 5.8 Step 8 — Reassembly and Final Torque
- 5.9 Step 9 — First Start and Break-In
- 6 How Difficult Is It Compared to Other Common Motorcycle Repairs?
- 7 What Makes Motorcycle Cylinder Replacement Harder Than It Looks
- 8 How Engine Configuration Affects the Difficulty Level
- 9 Cost of Changing a Motorcycle Cylinder: DIY vs. Professional
- 10 Signs That Tell You a Motorcycle Cylinder Needs Attention Right Now
- 11 Should You Do It Yourself or Take It to a Shop?
- 12 Reconditioned vs. New Motorcycle Cylinder: Which One to Choose
- 13 Common Mistakes That Ruin a Perfectly Good Cylinder Replacement Job
- 14 Final Verdict on Difficulty and Whether It's Worth Doing Yourself
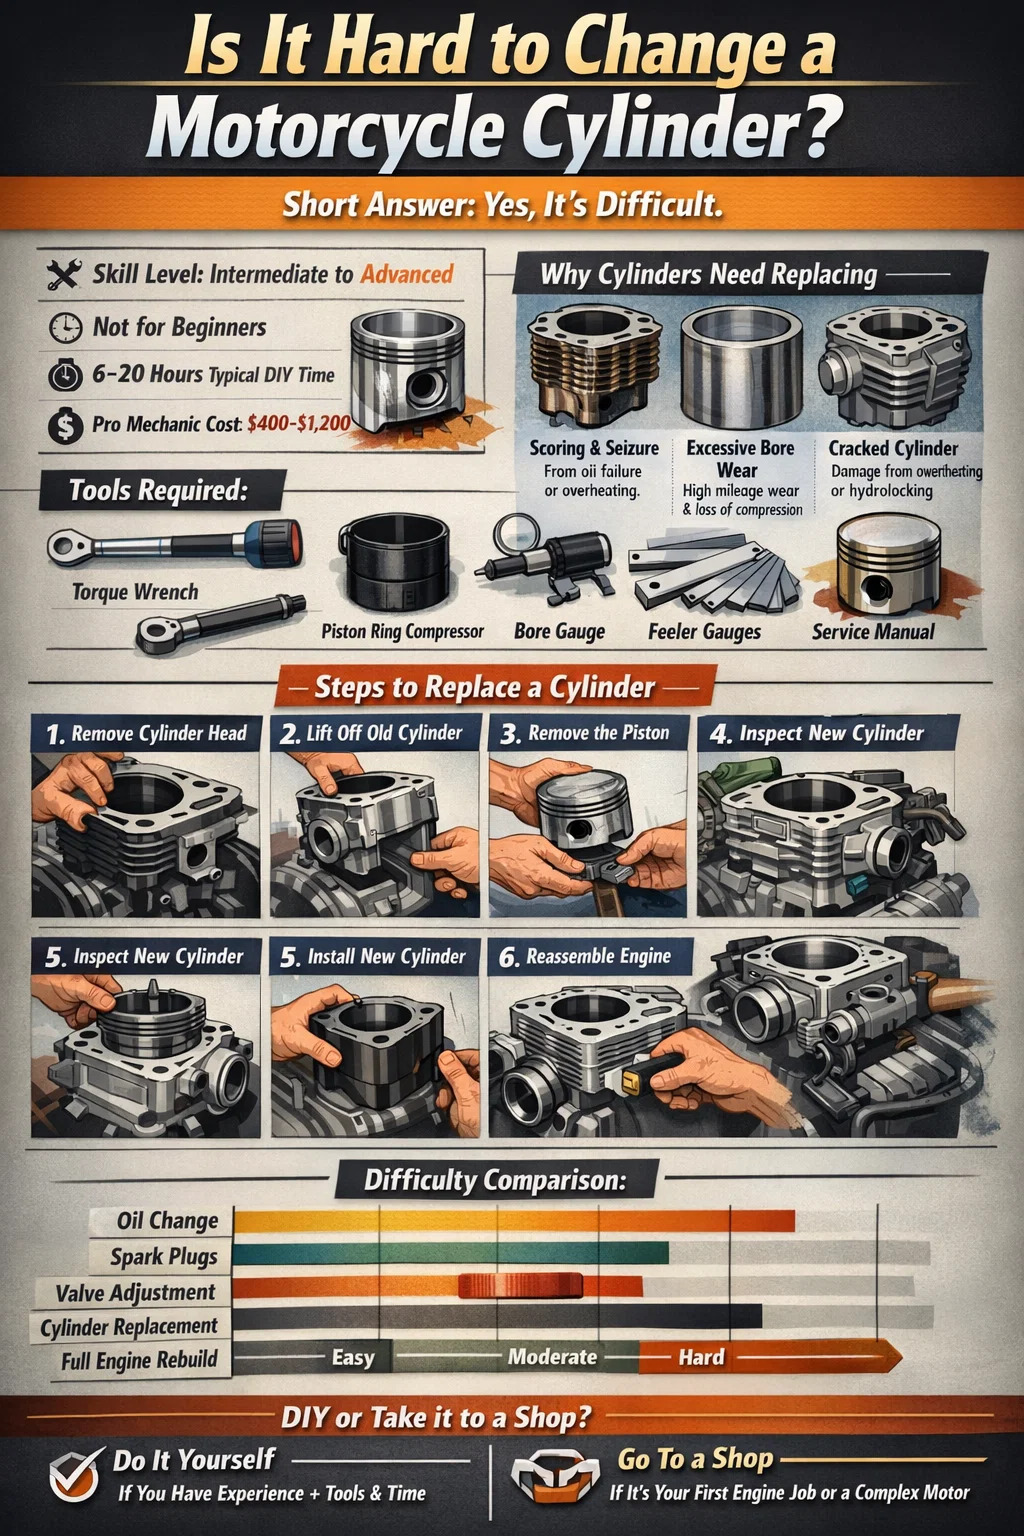
Is It Hard to Change a Motorcycle Cylinder? The Short Answer First
Changing a motorcycle cylinder is moderately to highly difficult depending on your bike's engine configuration, your mechanical experience, and the tools you have available. It is not a beginner-level job. For most riders without prior engine rebuilding experience, the process takes anywhere from 6 to 20 hours spread across multiple sessions. A professional mechanic typically charges between $400 and $1,200 in labor alone, which gives you a sense of the complexity involved.
That said, many intermediate-level home mechanics have successfully replaced a motorcycle cylinder with careful preparation, the right workshop manual, and patience. It is not impossible — it just demands respect for the process. If you have previously done valve adjustments, top-end rebuilds, or similar engine work, you already have much of the foundational knowledge needed.
This guide covers every angle: why cylinders need replacing, what the job actually involves step by step, what tools are required, how much it costs, how long it takes, and where people go wrong. By the end, you will be able to make a fully informed decision about whether to tackle this yourself or hand it over to a shop.
Why Would You Need to Change a Motorcycle Cylinder in the First Place?
A motorcycle cylinder does not wear out on a predictable schedule the way brake pads do. Cylinder replacement or reconditioning becomes necessary due to specific failure modes, most of which produce recognizable symptoms before total engine failure occurs.
Scoring and Seizure
Cylinder wall scoring happens when the piston or piston rings make direct metal-to-metal contact with the cylinder bore. This usually results from lubrication failure — running low on oil, using the wrong grade of oil, or an oil pump failure. Once scoring occurs, the cylinder bore has vertical scratches that disrupt the oil film and accelerate wear catastrophically. A seized engine, where the piston locks against the cylinder wall and stops rotating, almost always requires cylinder replacement alongside a new piston and rings.
Excessive Bore Wear Over High Mileage
Every motorcycle cylinder wears slightly with each combustion cycle. Over time, the bore becomes out-of-round or oversized beyond factory tolerance. Most manufacturers specify a maximum wear limit of 0.05 to 0.10 mm beyond the standard bore diameter. Once that threshold is crossed, compression drops, oil consumption rises, and power output falls noticeably. High-mileage bikes — particularly those with over 50,000 kilometers of hard use — often reach this stage.
Cracked or Damaged Cylinder
Physical damage from overheating, water ingestion (hydrolocking), or impact can crack a cylinder. A cracked cylinder almost never warrants repair — replacement is the only practical option. Symptoms include coolant mixing with oil, severe overheating without obvious cause, and loss of compression on one cylinder in a multi-cylinder engine.
Performance Upgrades
Some riders replace a motorcycle cylinder intentionally for performance reasons — fitting a big-bore kit that increases displacement. For example, a common upgrade on a 250cc single-cylinder engine might involve replacing the stock cylinder and piston with a 270cc or 300cc big-bore kit. This requires careful matching of compression ratio, carburetor jetting or fuel injection mapping, camshaft timing, and exhaust to realize any actual power gain.
How a Motorcycle Cylinder Actually Works: What You're Dealing With
Before attempting any engine work, understanding the component's function removes the mystery from the job and helps you avoid costly mistakes.
The motorcycle cylinder is the barrel-shaped housing in which the piston moves up and down. It sits between the cylinder head (which contains the valves and combustion chamber) and the crankcase (which houses the crankshaft and transmission). Every combustion event pushes the piston downward through the cylinder bore, converting pressure into rotational motion via the connecting rod and crankshaft.
The cylinder bore has a precisely machined surface — typically a crosshatch hone pattern — that holds a thin film of oil to lubricate the piston rings. The rings themselves form a near-perfect seal between the piston and bore, preventing combustion gases from escaping downward (blowby) and keeping oil from entering the combustion chamber.
In air-cooled engines, the cylinder has external fins to dissipate heat. In liquid-cooled engines, the cylinder contains water jacket passages that circulate coolant. This distinction matters enormously during disassembly — liquid-cooled systems require draining the cooling system before you remove the cylinder.
Many modern motorcycle cylinders use a steel or cast-iron sleeve pressed into an aluminum outer body. Others use a nikasil or similar coating applied directly to the aluminum bore. Nikasil-lined cylinders cannot be bored and re-sleeved in most cases — they must be replaced entirely if the bore is damaged beyond spec, which significantly affects your repair options and budget.
Tools Required to Change a Motorcycle Cylinder
Lack of proper tooling is the number one reason DIY cylinder jobs go wrong. Using the wrong tools can strip threads, damage mating surfaces, or result in improper torque that leads to immediate engine failure after reassembly.
- A quality torque wrench capable of reading in Newton-meters (typically covering 10–100 Nm range for cylinder bolts)
- Complete set of metric sockets and combination wrenches (most Japanese and European motorcycles are entirely metric)
- Piston ring compressor — essential for guiding the piston and rings back into the cylinder bore without breaking a ring
- Piston pin circlip pliers (the tiny snap rings holding the piston pin are easy to lose and difficult to install without the right tool)
- Bore gauge or dial gauge to measure cylinder diameter and determine whether the bore is within specification
- Feeler gauges for checking piston ring end gaps
- Plastic or rubber mallet (never use a steel hammer directly on engine components)
- Gasket scraper and surface preparation tools for cleaning mating surfaces
- Engine stand or a stable workbench that can support the engine or the bike securely
- Thread tap set (M6, M8, M10 at minimum) for cleaning or repairing damaged threads in the crankcase
- Factory service manual for your specific motorcycle model — not a generic guide, but the actual manufacturer's manual with torque specs and assembly sequences
If you do not already own a bore gauge, expect to spend $40 to $150 on a decent one. A piston ring compressor runs about $15 to $60. These are not optional — they are fundamental to doing the job correctly.
Step-by-Step Overview of Changing a Motorcycle Cylinder
The following process applies broadly to most four-stroke single and parallel-twin motorcycle engines. V-twin, inline-four, and other configurations follow the same principles but with added complexity. Always cross-reference every step against your specific service manual.
Step 1 — Preparation and Safety
Allow the engine to cool completely — at least two hours after the last run. Disconnect the negative battery terminal. Drain the engine oil by removing the drain plug and letting it flow into an appropriate catch pan. If your engine is liquid-cooled, drain the coolant as well. Fuel should be turned off at the petcock and the fuel line disconnected.
Step 2 — Remove External Components
Remove fairings, side covers, or any bodywork blocking access to the engine. Disconnect the exhaust pipe from the cylinder head — these bolts are often seized from heat cycles and may require penetrating oil applied the night before. Remove the carburetor or throttle body. Disconnect spark plug wire(s) and remove the spark plug(s).
Step 3 — Remove the Cylinder Head
The cylinder head sits on top of the cylinder and must be removed first. Loosen the cam chain tensioner before removing the camshaft(s). Remove the rocker cover, then the camshaft, taking careful note of the cam timing marks — a photo before disassembly is mandatory. The head bolts should be loosened in a cross pattern (opposite to the tightening sequence) and in stages to avoid warping the head. Typical four-stroke engines have 4 to 8 cylinder head bolts.
Step 4 — Remove the Cylinder
With the head removed, the cylinder itself can be lifted off the crankcase. Most cylinders are held down by the same studs that passed through the head, meaning no separate cylinder fasteners exist in many designs. However, some engines have separate base bolts. The cylinder should slide upward off the piston — resist the urge to rock it aggressively if it feels stuck. Light taps with a rubber mallet around the base fins usually free it. Once clear of the piston, set it aside carefully to avoid damaging the fins.
Step 5 — Inspect and Remove the Piston
With the cylinder removed, the piston is exposed on the connecting rod. Remove the piston pin circlips using the correct pliers — these small rings can fly across the garage and are almost impossible to find again. Slide the piston pin out and remove the piston. Inspect the piston for scoring, cracks, or collapsed ring lands. Old piston rings must always be replaced when installing a new or reconditioned cylinder.
Step 6 — Inspect and Measure the New Cylinder
Before installation, measure the new cylinder bore at multiple points — top, middle, and bottom — and at two perpendicular orientations. Confirm that the bore diameter matches the specification for your piston size. Check piston-to-bore clearance (typically 0.02 to 0.05 mm for most four-stroke engines). Verify piston ring end gaps by inserting each ring into the bore and measuring with a feeler gauge.
Step 7 — Install the New Cylinder
Install the new piston with new rings and a new piston pin if required. Fit the new base gasket to the crankcase mating surface — never reuse old gaskets. Lightly oil the cylinder bore and the piston rings. Carefully position the ring gaps according to manufacturer specification (gaps should not be aligned, as this would allow blowby). Use the piston ring compressor to compress the rings, then slowly slide the cylinder down over the piston. Once past the rings, the cylinder drops into place on the crankcase studs.
Step 8 — Reassembly and Final Torque
Reinstall the cylinder head with a new head gasket. Torque all head bolts to specification in the correct sequence and typically in multiple stages — for example, first to 20 Nm, then to full spec of 40–60 Nm depending on engine design. Reinstall the camshaft with timing marks aligned exactly. Set the cam chain tension. Reinstall all external components in reverse order of removal. Refill with fresh engine oil and coolant if applicable.
Step 9 — First Start and Break-In
Before starting, crank the engine briefly with the spark plug removed to build oil pressure without firing the engine. Reinstall the plug, then start and immediately monitor for oil leaks, coolant leaks, and unusual noises. A new motorcycle cylinder requires a proper break-in period — typically 500 to 1,000 km of varied load riding, avoiding sustained high RPM during this period. Change the oil at the end of the break-in period to flush out any fine metallic particles.
How Difficult Is It Compared to Other Common Motorcycle Repairs?
Putting cylinder replacement in context helps calibrate your expectations. The table below compares motorcycle cylinder replacement to other common repair jobs on a difficulty and time scale.
| Repair Job | Difficulty (1–10) | Typical Time (DIY) | Special Tools Needed? |
|---|---|---|---|
| Oil change | 2 | 20–40 minutes | No |
| Spark plug replacement | 2 | 15–30 minutes | No |
| Valve clearance adjustment | 5 | 3–6 hours | Feeler gauges, torque wrench |
| Piston ring replacement only | 6 | 5–10 hours | Yes — ring compressor, torque wrench |
| Motorcycle cylinder replacement | 7–8 | 8–20 hours | Yes — multiple specialized tools |
| Full engine rebuild | 9–10 | 30–80+ hours | Yes — extensive tooling required |
The takeaway from this comparison is that cylinder replacement sits firmly in intermediate-to-advanced territory. It is not the most complex engine job possible, but it is several steps beyond basic maintenance. If you have done valve clearance work before, cylinder replacement is a logical next challenge — more disassembly is involved, but the principles are the same.
What Makes Motorcycle Cylinder Replacement Harder Than It Looks
There are several factors that catch inexperienced mechanics off guard. Being aware of them ahead of time prevents avoidable failures.
Seized or Stripped Fasteners
Engine fasteners experience extreme heat cycling. Bolts that have been in place for years — particularly exhaust manifold bolts and cylinder studs — are frequently seized with rust or thread compound corrosion. Forcing a seized bolt strips it, and extracting a broken bolt from a cylinder or crankcase is a genuinely difficult job requiring precision drilling and thread extraction tools. Applying penetrating oil 24 to 48 hours before disassembly and using an impact driver rather than a ratchet for initial break-loose torque dramatically reduces this risk.
Cam Timing Errors
Reinstalling the camshaft with incorrect timing is one of the most common — and catastrophic — reassembly errors. Even being off by one tooth on the cam chain sprocket can result in valve-to-piston contact when the engine fires. On interference-fit engines (where valve and piston paths overlap), this bends valves instantly and destroys the engine. Photograph the cam timing marks from multiple angles before disassembly, and verify them again before rotating the engine by hand after reassembly.
Piston Ring Installation Mistakes
Piston rings have a specific orientation — many have a top and bottom side marked by a dot or the word "TOP." Installing a ring upside down can result in oil consumption, poor compression, or a ring that breaks during the first heat cycle. Additionally, rings must be installed in the correct groove — compression rings go in the upper grooves, the oil control ring assembly goes in the lower groove. Mixing these up causes immediate engine damage.
Surface Preparation of Mating Faces
Old gasket material left on the cylinder base or cylinder head mating surfaces causes compression leaks even with a new gasket installed. Removing all old gasket material without gouging the aluminum sealing surface requires patience and the correct scraper technique — plastic scrapers supplemented with very fine abrasive pads, not metal scrapers dragged aggressively across the surface. Any gouge deeper than approximately 0.1 mm that runs across a sealing area can cause a persistent leak.
Improper Torque Sequencing
Head bolts must be torqued in a specific cross-pattern sequence and in multiple stages. Torquing one bolt fully before moving to the next pulls the head gasket unevenly, causing warping or localized leaks. A warped head is an expensive problem — resurface or replace. The sequence is always provided in the service manual and must be followed exactly. This is not an area where approximation is acceptable.
How Engine Configuration Affects the Difficulty Level
Not all motorcycle cylinder jobs are equally hard. Engine layout and design have a significant impact on the time and complexity involved.
Single-Cylinder Engines
Trail bikes, dual-sport bikes, and many small commuters use a single-cylinder engine — sometimes called a "thumper." These are the most accessible engines for DIY cylinder work. With only one cylinder, one piston, and straightforward overhead cam architecture in most modern designs, the job is manageable for an intermediate-level home mechanic. Expect 8–14 hours for a first-time attempt on a typical 250–500cc thumper.
Parallel-Twin Engines
Popular in mid-size adventure and roadster motorcycles, parallel-twin engines double the component count but share one cylinder block casting in most designs. Both pistons must typically be dealt with simultaneously during cylinder removal. The job is roughly 40–60% more complex than a single-cylinder equivalent. Access to the rear of the engine can also be limited on some frame configurations.
V-Twin Engines
Found on cruisers and some performance bikes, V-twin motorcycle engines have two separate cylinders mounted at an angle relative to each other. Each cylinder can technically be serviced somewhat independently, but access to the rear cylinder is often severely restricted by the frame, fuel tank, and other components. Engine removal from the frame may be required for the rear cylinder on some V-twin designs, dramatically increasing the scope of the job.
Inline-Four Engines
Sport bikes and high-performance roadsters often use inline-four engines. Replacing a motorcycle cylinder on an inline-four typically requires complete engine removal from the frame first — the engine is too wide and the cylinders are too tightly packaged for top-end work in the frame. With the engine on a stand, the process is more manageable, but the sheer number of components (four pistons, four sets of rings, four valve trains) makes this a substantial undertaking. Budget 20–40 hours for an inline-four cylinder replacement as a first-time job.
Cost of Changing a Motorcycle Cylinder: DIY vs. Professional
Cost is a major factor in the DIY versus shop decision. The breakdown below covers typical expenses for both approaches across different engine types.
| Cost Item | DIY Estimate (USD) | Professional Mechanic (USD) |
|---|---|---|
| New cylinder (OEM, single) | $150–$600 | $150–$600 (parts same) |
| Piston, rings, gasket kit | $80–$300 | $80–$300 |
| Specialized tools (one-time purchase) | $100–$400 | N/A (shop already has these) |
| Service manual | $30–$80 | N/A |
| Labor cost | $0 (your time) | $400–$1,200 |
| Total estimate (single cylinder) | $360–$1,380 | $630–$2,100 |
The cost advantage of DIY is real — you can save $400 to $1,200 or more depending on shop rates. However, a botched DIY job that requires a shop to diagnose and fix the errors can cost significantly more than simply having it done professionally from the start. The financial argument for DIY only holds if you execute the job correctly.
Aftermarket cylinder options — particularly for popular models — can reduce parts costs considerably. A remanufactured or aftermarket cylinder for a common Yamaha WR250R or Honda CRF450 might cost $90–$200 versus $300–$600 for OEM. Quality varies significantly between aftermarket suppliers, so research specific brands before committing.
Signs That Tell You a Motorcycle Cylinder Needs Attention Right Now
Catching cylinder problems early prevents the kind of catastrophic engine failure that turns a cylinder replacement job into a full engine rebuild. Watch for these warning signs.
- Blue or grey smoke from the exhaust — particularly on startup or deceleration — indicates oil is burning in the combustion chamber, often due to worn rings or a worn bore
- Rapidly increasing oil consumption without visible external leaks — consuming more than 100 ml per 1,000 km warrants investigation
- Loss of compression — a compression test reading more than 10–15% below factory specification signals cylinder or valve problems
- A wet compression test that shows significant improvement over a dry test (squirting a small amount of oil into the cylinder before testing) confirms ring-to-bore seal failure rather than valve issues
- Metallic ticking or rattling sounds that increase with RPM and were not present previously
- Engine that is difficult to start cold but fine once warm — particularly on single-cylinder bikes — can indicate low compression
- Chronic overheating in a liquid-cooled engine without obvious coolant system fault can indicate combustion gas entering the cooling system via a cracked cylinder or blown head gasket
Should You Do It Yourself or Take It to a Shop?
This is the central question, and the answer depends on an honest self-assessment across several dimensions.
Do It Yourself If:
- You have completed at least valve clearance adjustment or camshaft removal on your own bike previously
- You own or can borrow the necessary specialized tools — particularly a torque wrench and bore gauge
- You have the factory service manual for your specific model
- You can afford the time — plan for significantly more time than you expect, especially on the first attempt
- The motorcycle is not your primary transportation and you can afford downtime if complications arise
- You are working on a simple single-cylinder engine rather than a complex inline-four or V-twin with poor access
Take It to a Shop If:
- This would be your first engine-internal repair and you have not previously disassembled a top-end
- You do not have a torque wrench — this is genuinely non-negotiable for engine work
- The engine is a complex multi-cylinder configuration with difficult access
- The cylinder damage is secondary to another serious problem — a seized engine or bent valves — that requires more extensive diagnosis and repair
- The motorcycle is a high-value machine and a mistake would be financially devastating
- You need the bike back on the road within a specific, short timeframe
A middle path is also worth considering: do the disassembly and reassembly yourself, but take the bare cylinder to a machine shop for bore measurement and honing if needed. Machine shops with engine work experience charge approximately $50–$150 to inspect, measure, and hone a motorcycle cylinder — giving you professionally verified parts while keeping most of the labor savings.
Reconditioned vs. New Motorcycle Cylinder: Which One to Choose
When sourcing a replacement cylinder, you have several options, each with trade-offs in cost, availability, and quality.
New OEM Cylinder
A new original equipment manufacturer cylinder is the safest choice — guaranteed to meet factory specifications, no unknown wear history, and full warranty protection in most cases. It is also the most expensive. For popular models, OEM availability is rarely a problem. For older or discontinued bikes, OEM parts may no longer be manufactured, forcing other choices.
Quality Aftermarket Cylinder
Reputable aftermarket brands — such as Wiseco, Namura, and Cylinder Works for off-road bikes, or Athena for European models — produce cylinders that meet or exceed OEM specifications. Cylinder Works, for example, offers nikasil-lined cylinders for many popular dirt bikes at roughly 60–75% of OEM cost with equivalent durability. Research specific brand reputation for your model before purchasing.
Reconditioned (Rebored) Cylinder
If the original cylinder bore is scored but not cracked, and uses a replaceable steel sleeve rather than a nikasil coating, it may be possible to have it bored oversize at a machine shop and fit an oversize piston. Most engines support one or two oversize options (typically +0.25 mm and +0.50 mm) before the bore diameter exceeds safe limits. This can be the most economical option if the oversize piston and rings cost significantly less than a new cylinder assembly.
Used Cylinder from a Salvage Engine
Buying a used cylinder from a wrecked or non-running donor bike is the riskiest option. You cannot verify the bore condition without measurement, and a worn or previously repaired bore may fail quickly. If you take this route, always measure the bore before installation and replace the piston rings regardless of apparent condition. Only consider this if the cylinder is cheap enough that the potential failure represents an acceptable financial risk.
Common Mistakes That Ruin a Perfectly Good Cylinder Replacement Job
These are the errors that show up repeatedly in forum posts from riders whose engines failed shortly after a cylinder replacement — sometimes within the first 100 km.
- Not replacing the head gasket when reinstalling the original head — always fit a new gasket, never reuse a compressed one
- Forgetting to check valve clearance after reassembly — installing a new cylinder changes the compression ratio slightly in some cases, and valve clearance must always be confirmed on assembly
- Failing to properly seat the piston rings by omitting the break-in procedure — riding hard immediately after installation prevents rings from seating, causing permanent oil consumption
- Installing the cylinder base gasket without confirming the dowel pins are seated in the crankcase — a cylinder that sits slightly off-center due to missing dowels will leak and may crack
- Not checking ring end gaps against specification before assembly — rings that are too tight will seize as they expand with heat
- Using RTV sealant in place of a proper gasket — silicone sealant can be drawn into oil passages and clog oil flow to critical components
- Overtorquing cylinder head bolts — aluminum threads strip easily, and a pull-out thread repair (helicoil insert) in a cylinder head adds cost and complication
- Forgetting to reinstall the circlip on the piston pin — a missing circlip allows the piston pin to migrate sideways under load, scoring the cylinder wall catastrophically within minutes of engine startup
Final Verdict on Difficulty and Whether It's Worth Doing Yourself
Changing a motorcycle cylinder is genuinely challenging but absolutely achievable for a prepared, patient home mechanic. The difficulty is not in any single step being technically overwhelming — it is in the cumulative precision required across many steps, each of which must be executed correctly for the engine to run reliably afterward.
The job rewards methodical preparation: read the manual before you start, gather all tools and parts before disassembly, photograph everything, take measurements at every relevant stage, and resist the temptation to rush the reassembly when you are 90% done and eager to start the engine.
For most single-cylinder motorcycle engines, a first-time DIY cylinder replacement will take a full weekend of focused work. That same job done at a competent motorcycle shop would be completed in a day and would cost $600 to $2,000 depending on parts and labor rates. The decision ultimately comes down to your confidence in your own precision, the time you have available, and the financial risk you are willing to absorb if something goes wrong.
If you go into the job with the right mindset — treating every torque spec as mandatory, every measurement as essential, and every step from the manual as the correct way rather than a suggestion — the motorcycle cylinder replacement is a deeply satisfying repair that teaches you more about your engine than almost any other job on the bike.
 Aluminum Alloy Motorcycle Cylinder for Yamaha Engine Parts")

 wear-resistant Yamaha aluminum alloy motorcycle cylinder")
 durable Yamaha engine cylinder")
 Yamaha aluminum high-performance motorcycle engine cylinder")
 Yamaha aluminum alloy motorcycle components")
 Yamaha motorcycle cylinder engine parts")
 Yamaha water-cooled aluminum engine cylinder")
